This Halloween graveyard is a must for your DIY outdoor Halloween decorations! Create a spooky, cheap, and easy Halloween fence and be the talk of the town!
The kids absolutely love all of the fun, scary DIY outdoor Halloween decorations that we come across in our neighborhood, even if they act like they are scared at first! Haha!
There are always so many great Halloween decorations in our area so of course we had to show off our stuff and add our own to the mix 🙂
Our specialty? A Halloween graveyard!
It’s so fun to set up as Halloween gets closer and really gets us in the spooky spirit!
DIY outdoor Halloween decorations are the absolute most fun for my family to create!

Now before I even tell you about this totally awesome and frugal Halloween fence and graveyard, I have to give all the credit to my Dad.
He actually made it a few years ago and when he brought it over for us to use in our yard I just had to share! What an amazing creation.
Usually, I stick with the fun indoor Halloween decorations, like these Halloween Fireplace Mantels. But, when your family is willing to help you create some scary DIY outdoor Halloween decorations, who am I to say no? 😉
And I love that it’s something that can easily be used over and over again throughout the years!
How to Make a Halloween Graveyard
Just look at this graveyard fence! Doesn’t it look authentic?

Take a guess at what this homemade Halloween fence is made out of? Looks heavy and probably cost a pretty penny to make it, right? Wrong!
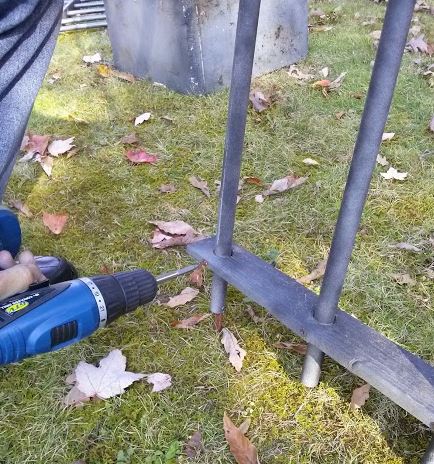
And don’t worry you won’t need any crazy tools either…you’ll just need a hack saw and drill!

The fence is actually made from furring strips (less than $2 for an 8′ strip) and 3/4″ PVC conduit and/or 1″ PVC conduit (less than $3 for a 10′ piece) and is really light.
Using a hack saw, the conduit was cut into 18″ – 24″ pieces for the fence and 40″ – 60″ for the gate. The bottom of each piece was cut straight across while the top was cut at an angle.
Holes for the fence spokes in the furring strips were cut using a coordinating width wood bit. Then different sizes of fence spokes were scattered across the furring strips.

Drywall screws were used to fasten the fence spokes in the furring strips.
The fences were painted with black and gray spray paint for a metal look. It definitely looks like a more sturdy contraption, doesn’t it?

To secure the fence in the yard, rebar was staked into the ground. The drywall screw from the lower furring strip was loosened and an end fence spoke was simply placed over the rebar.
The screw was then tightened against the rebar to hold it in place.
You can spruce up your spooky fence even more by adding lights and other Halloween decorations such as skeletons, skulls, and other ghouls. We put some fun black lights out in the yard to really light things up at night and make the whole scene seem even more “spooky.”
Fence Pillars

That’s right! Our halloween graveyard fence wasn’t complete without adding some pillars around the fence, as well!
The pillars were formed using scrap pieces of plywood, paneling, or any other thin pieces of wood. Styrofoam sheets were then glued to the wood and caulked together to give them a stone-looking finish. If you have any styrofoam coolers from past purchases you can cut those up to use 😉
After assembled, the pillars were painted with black and gray spray paint. When painting your pillars be sure to use a latex-based paint as spray paint will melt your styrofoam.
Light up decorations were then secured to the top of the pillars for added effect.
You could even put some Halloween music speakers to play spooky music during trick-or-treat time. Just think of how much all of the little kiddos will love all of the effects you add in!

The inside of the pillars were weighted with rocks and bricks. This is also a great place for housing green spotlights shining out towards the tombstones to create an eerie graveyard display at night.
DIY Halloween Tombstones

What’s a Halloween graveyard fence without tombstones inside?!
Believe it or not, the tombstones in this photo were actually made from concrete!
Back in the day there were thin plastic, open-backed tombstone decorations sold. They were pretty flimsy (and cheap), but worked good to just lean against a wall in your home…they looked just like a large candy mold.
Well, that just wasn’t going to work for an outdoor Halloween graveyard!

My Dad thought they looked like a mold too and took some Quikrete sand mix, added two spikes near the bottom as a way to secure them in the ground, and let the concrete set in the “mold.” Once it was dry the mold easily peeled off and was ready to use for the next one.
A DIY graveyard doesn’t get more authentic than that!
I have been looking for these tombstone “molds” everywhere and can’t seem to find them. If anyone comes across a place that they can still be purchased I would love it if you could share 🙂
UPDATE – Looks like there may be similar, smaller molds available at Dollar Tree. Thanks Kym!
Names were added using black light paint pens since on Halloween we’ll be throwing a few black lights out in our display too.
And that’s it! Nothing too hard or expensive for what appears to be a real haunted Halloween graveyard!

If you are looking for things that will get the kids even more involved, try these 10 Frightfully Frugal Halloween Crafts for Kids.


Amazing!
Did he put up any of that wire mesh (no-not the official name 🙂 ) inside the concrete to make them last longer ? If not, how have they held up so far? I have found smaller tomb decorations that might work from the Dollar tree this year but not nearly as nice and large.
These are all amazing ideas..so helpful !
Thank you! No he didn’t put any mesh in the tombstones and they still look great! Maybe because they aren’t that big they didn’t need any? (Just a guess 🙂 )
Your wire mesh idea is a good one! Thanks for that tip 🙂
Nope! No wire mesh…just poured some Quikrete into the “molds” 🙂 And they’ve held up great! Every one is still in tact with no chips or even cracks.
Hi.. can you tell me what you would put in the mould to allow the concrete tombstones to be removed easily.
Hello! He actually didn’t put anything in the molds, just the Quikcrete. I just double checked with him and he said since they were plastic they were smooth and bent so they were easy to remove.
On the fence, how far was the spacing between each fence spoke?
I thought it said 4 inches between when you are drilling the holes
They’re about 6″ apart but we just eye-balled them 🙂